Help Center
No matching help topics found.
Try adjusting your search terms.
Can’t find what you’re looking for?
Message the SecretariatWho can register?
- User / PPOC – Anyone from an organization planning to make commitments as part of the Our Ocean Conference initiative.
- Host / Super Host – Registration is only available to invited users. They will automatically be linked to their hosting organization.
How to register?
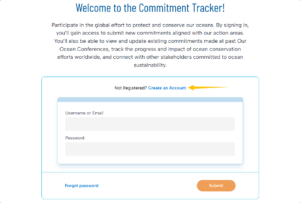
From the website
1. Follow the link https://commitments.ouroceanconference.org/login/
2. Click on Create an Account
3. Fill out the form
Please refer to the Selecting my organization section below for further clarification about this step.
4. Click on the Create Account button
5. Wait for the confirmation email (a Host will approve)
From an invitation
1. Follow the link you received in the email
2. Fill out the form
3. Click on the Create Account button
4. Wait for the confirmation email (a Host will approve)
Selecting my organization
Expand the Organization drop-down list and check the list of organizations that appear on the screen. If you see your organization listed, select it from the list.
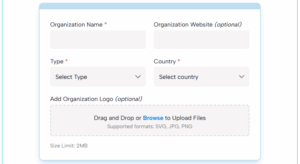
If your organization does not yet exist, select the Create New Organization option from the drop-down list.
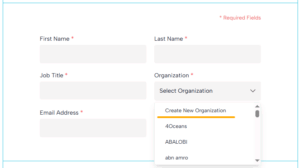
Fill in the fields to create a new Organization.
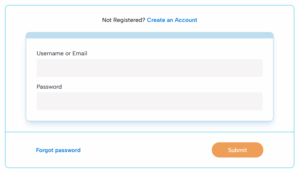
In case you forgot your password, you can create a new password by following these steps:
1. Click on Forgot password on the login page https://commitments.ouroceanconference.org/login/
2. Enter your Username or Email address and press the Submit button
3. You will receive an email containing a link to reset your password
4. Click that link and enter your new password
5. Press the Submit button
You have now changed your password.
Sign in
To sign in, enter your Username or Email address and your password and press the Submit button on the login page.
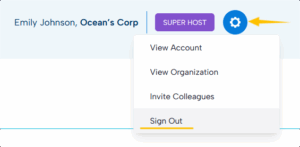
Sign out
To sign out, click on the cog icon in the top right of the screen and select Sign out.
How to complete your account?
Completing both personal and organization profiles is required to create commitments for USER/PPOC roles and to manage them for HOST/SUPER HOST roles.
Your personal account
1. Click on the cog icon in the top right of the screen and select View Account
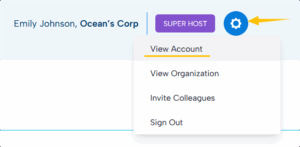
2. Click on the Edit Account button
3. Complete any missing information
* First name, last name, job title, organization, and email address are mandatory fields.
4. Click on the Save button
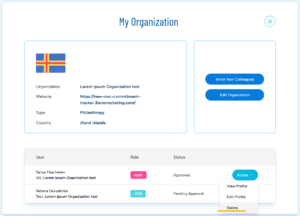
Your organization account
1. Click on the cog icon in the top right of the screen and select View Organization
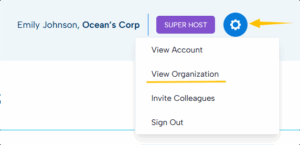
2. Click on the Edit Organization button
3. Complete any missing information
* Organization name, entity type, and country are mandatory fields.
4. Click on the Save button
You can easily invite other colleagues belonging to your organization by following the next steps:
Inviting during account creation
1. Go to the third step in the registration form
2. Enter the email addresses separated by commas of the colleagues you want to invite
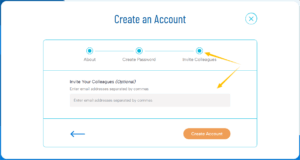
3. Click the Create Account button to complete the process
Inviting via the dropdown menu
1. Click on the cog icon in the top right of the screen and select Invite Colleagues
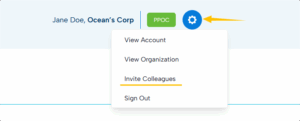 2. Enter the email addresses of your colleagues separated by commas
3. Click on the Invite Team button
Inviting from the organization account
1. Click on the cog icon in the top right of the screen and select View Organization
2. Click on the Invite Your Colleagues button
3. Enter the email addresses of your colleagues separated by commas
4. Click on the Invite Team button
There is a predefined workflow associated with commitments, from their creation to approval, publishing, progress updating, and closing. Please refer to the Flow Chart tab to better understand the entire workflow.
How to create a commitment?
To be able to create commitments, your personal and organization profiles must be completed and valid.
What type of commitments can be submitted?
Initiatives announced at the conference should be new, significant, and impactful actions that will tangibly advance ocean conservation. While announcements related to the four conference themes are encouraged, significant actions related to other aspects of ocean conservation will be considered for announcement as well.
How to create a draft?
1. Click on the Create Your First Commitment button (or Create New Commitment if it is not the first one already) on the Dashboard
2. Fill in the form
* Conference, Title, Description, Geographic Area, Status (Years, Value), and Primary Action Area are mandatory fields.
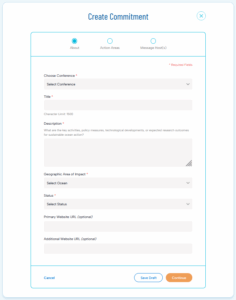
3. Click on the Save Draft button
Your commitment is now created and has been assigned to the Draft status.
How to submit a commitment?
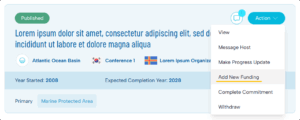
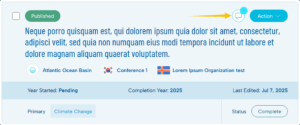
1. Find your commitment on the dashboard. If needed, you can filter the displayed commitments by using the filters available on the left part of the screen.
2. Click on the Action button on the row of your commitment
3. Click on the Submit button in the dropdown list
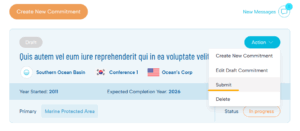
4. Confirm sending in the window that appears
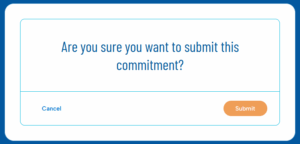
Your commitment is now submitted for validation and approval by the host. It has been assigned the Submitted status.
How do I know if my commitment has been approved?
Once your commitment is approved by the host, you will be notified by email. You can also find your commitment on the dashboard and check its status. If your commitment has been approved, it will be assigned the Approved status.
What if my commitment was rejected?
When a commitment is rejected by the host, you will no longer be able to make any changes. There are several reasons for which a commitment can be rejected, but it generally means that it is not in the scope of the OOC.
How to delete a commitment?
You can only delete commitments that are in Draft or Rejected status.
1. Find your commitment on the dashboard
2. Click on the Action button on the row of your commitment
3. Click on the Delete button in the dropdown list
4. Confirm the deletion in the window that appears
How to update a commitment?
How to revise a commitment?
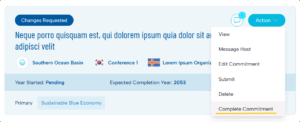
Following the review process for a new commitment or when completing a commitment, a Host may require some changes before they can approve. These commitments will be assigned the Changes Requested status.
To revise the commitment, complete the following steps:
1. Select the commitment that has been assigned Changes Requested.
2. Review the host feedback in the Private Activity Log.
3. To begin revisions, select Edit Commitment.
4. Make the necessary edits to the commitment fields.
5. When ready, select Submit again.
6. The Host will then review the changes and either approve, request further changes, or reject.
Users can privately communicate with the host throughout this process by using the Message Host function.
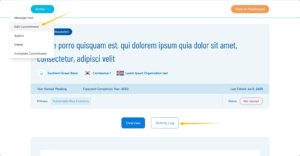
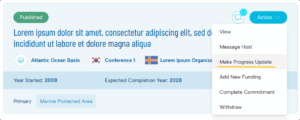
How to make a progress update?
Once a new commitment has been published by the Host, Users are encouraged to report each year on their progress and achievements. Users who submit high impact progress updates may be contacted by the host to showcase their progress at the Our Ocean Conference. Making a progress update is only possible for Published Not Started, or In Progress commitments. There are two types of progress update: narrative updates and funding updates. Both types of progress updates are posted publicly.
To make a narrative update:
Navigate to the published commitment you would like to Make a Progress Update.
2. Input your Updates on the implementation of this commitment, including any notable outcomes or markers of progress, the amount/proportion of funds disbursed, and next steps towards completion.
3. Click on the Send button.
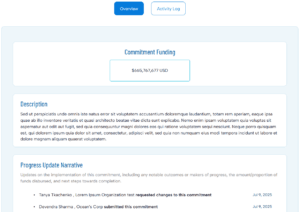
If you view your commitment, you can see that the progress update has been posted under the overview.
To make a funding update:
1. Navigate to the published commitment you would like to make a Funding Update.
2. Input the amount of additional funding that is being allocated and the year.
3. Click on the Save button.
4. If you view your commitment, you can see that the progress update has been posted under the overview.
Users can privately communicate with the host throughout this process by using the Message Host function.
How to complete the commitment?
The OOC workflow design has two loops in which the host should approve a commitment. The completion review is the second and final review loop in the commitments process.
It should apply to all commitments that are completed after they have been published (so not those complete-at-point-of-submission). A published Not Started and a published In Progress commitment that a user decides to complete should be assigned the ‘Completion Review’ phase before it is published again. The OOC flow design has two loops in which the host should approve a commitment. The completion review is the second and final review loop in the commitments process.
The process is essentially the same as the submission Review; however, there is no Reject option as the commitment is already valid on the system.
A Host will review and then can either Approve this completion, Request a change (if a user has completed but not provided sufficient information or evidence), or Post a private message to the user.
If the Host approves, the commitment goes back to the Published phase, and the status updates to Complete. This is the final form of the commitment.
If the Host Requests a change, the commitment goes back to the Changes Requested phase. This should be accompanied by a private message from the host. The user will need to revise the commitment and select Complete again. It will then be in the Completion Review phase again for the Host to make another decision.
I received an email asking for more information, what does it mean?
You can receive an email asking for more information either when you submit a commitment or when you make an update to an existing commitment changing its progress to Completed. This happens because the host didn’t approve your new commitment or your progress update. In such cases the host, normally adds a comment with the reason for such demand. You’ll be able to further edit your commitment with the necessary additional information requested by the host by following the link provided in the email.
How to search my commitments?
You can search all commitments on the Dashboard using a combination of the following filters:
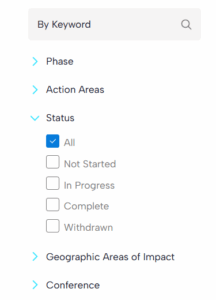
- Text search field, which will search within the commitment’s title and description
- Phase checkbox section, where you can select where you can select one or more phases
- Action Areas checkbox section, where you can select one or more themes
- Status checkbox section, where you can select one or more statuses of commitments
- Geographic Areas of Impact checkbox section, where you can select one or more areas
- Conference checkbox section, where you can select one or more conferences
Whenever you change one of these filters, a new search is performed, and only the commitments matching your criteria will appear in the table.
There is a predefined workflow associated with commitments, from their creation to approval, publishing, progress updating, and closing. Please refer to the Flow Chart tab to better understand the entire workflow.
To be able to manage commitments, your personal and organisation profiles must be completed and valid. All management tasks related to commitments are made available in the Commitments tab of the dashboard.
At any point in time, in the whole lifecycle of a commitment, the host can add additional messages to the commitment itself.
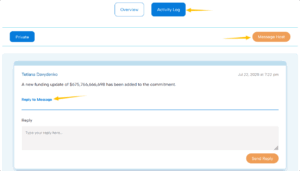
Add a private message
A private comment can only be visible to HOST or Organization users. This can be used like an internal communication tool on a per-commitment basis.
Send a message to the Organization:
1. Click on the Action button on the row of commitment
2. Click on the Message Organization button in the dropdown list
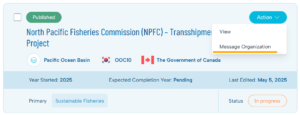
3. Type your message
4. Press the Send Message to Organization button
or the second way:
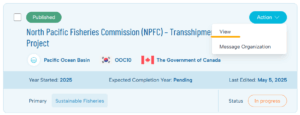
1. Click the View button in the Action drop-down list of the desired Commitment
2. Go to the Activity Log tab
3. Click on the Reply to Message button
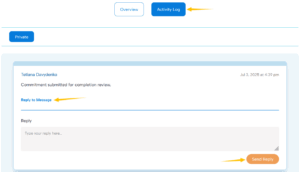
4. Type your message
5. Press the Send Reply button
View public message
A public message is visible to both HOST and POC users. Public messages are notifications about the progress status.
To view public messages:
1.Click the View button in the Action drop-down list of the desired Commitment
2. View the Overview tab
How to approve a commitment?
Whenever a new commitment is submitted by a POC, you will see a notification in the Commitments tab of your dashboard indicating how many commitments need your attention.
Another way to view all commitments that need approval is to use the Phase filter on the left so that only submitted commitments are shown in the table.
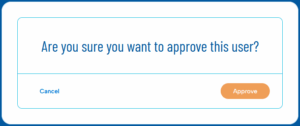
Once you have found the commitments that were submitted for approval, you will need to approve them one by one.
1. Click on the Action button on the row of commitment
2. Click on the Approve button in the dropdown list
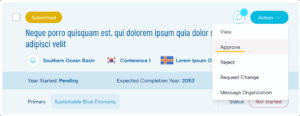
3. If you wish, you can add a message and press the Approve button
(This is a private message between Host and the organization, and it will not be seen publicly.)
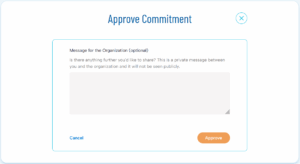
Once you approve a commitment, an email will be sent to the POC who requested approval.
How to request more information from the POC?
When a commitment is submitted by a POC for your approval, you are able to request more information (for example, a clearer description). Following the same steps as described below, you will be able to make this request.
1. Click on the Action button on the row of commitment
2. Click on the Request Change button in the dropdown list
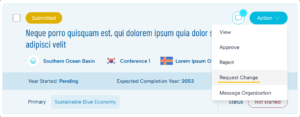
3. Enter your comments specifying what you are requesting and press the Request Changes button
A message will then be sent to the POC with your comments. They will then need to make the necessary changes and resubmit their commitment for approval.
How to reject a commitment?
A commitment can be rejected if you think it doesn’t meet the necessary standards within the OOC scope. Once you reject a commitment, it will be blocked from further editing, and no more actions can be taken upon this commitment.
Following the same steps as described below, you will be able to make this request.
1. Click on the Action button on the row of commitment
2. Click on the Reject button in the dropdown list
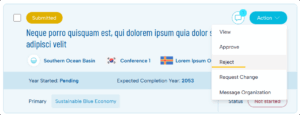
3. Enter your comments specifying why the commitment is being rejected and press the Reject button (This is a private message between the Host and the organization, and it will not be seen publicly.)
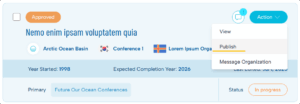
How to publish commitments?
The publication process applies to all approved commitments.
To publish commitments:
1. Go to the Commitments tab in the dashboard
2. Select Publish in the Action drop-down list
How to Approve Completion after the POC has updated the status?
The OOC flow design has two loops in which the host should approve a commitment. The completion review is the second and final review loop in the commitments process.
It should apply to all commitments that are completed after they have been published (so not those complete-at-point-of-submission). A published Not Started and a published In Progress commitment that a user decides to complete should be assigned the ‘Completion Review’ phase before it is published again. The OOC flow design has two loops in which the host should approve a commitment. The completion review is the second and final review loop in the commitments process.
The process is essentially the same as the submission Review; however, there is no Reject option as the commitment is already valid on the system.
A Host will review and then can either Approve this completion, Request a change (if a user has completed but not provided sufficient information or evidence), or Post a private message to the user.
If the Host approves, the commitment goes back to the Published phase, and the status updates to Complete. This is the final form of the commitment.
If the Host Requests a change, the commitment goes back to the Changes Requested phase. This should be accompanied by a private message from the host. The user will need to revise the commitment and select Complete again. It will then be in the Completion Review phase again for the Host to make another decision.
How to search for commitments?
You can search all commitments in the dashboard through the combined use of several filters:
- Text search field, that will search within the commitment’s title and description
- Phase checkbox section, where you can select where you can select one or multiple phases
- Action Areas checkbox section, where you can select one or multiple themes
- Status checkbox section, where you can select one or multiple statuses of commitments
- Geographic Areas of Impact checkbox section, where you can select one or multiple areas
- Conference checkbox section, where you can select one or multiple conferences
Whenever you change one of these filters, a new search is performed, and only the commitments matching your search criteria will be displayed in the table.
Notification of POC actions
If the POC has performed certain actions with the Commitment, you will see a notification icon, which you can click to view the Activity Log.
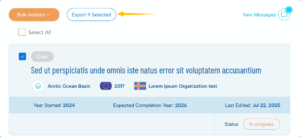
How to export a list of commitments?
You can export a list containing all commitments that match your search criteria. This list is a comma-separated value (CSV) file containing the commitment’s year, type, title, budget, progress, and other information. The separator used is a tab. To export the list of commitments, simply go to the Commitments tab of the dashboard, select the desired commitments, and click on the export button.
All tasks related to managing users are made available in the Users tab of the dashboard.
How to approve a user?
Whenever a new user registers, you will see a notification on the Users tab of your dashboard indicating how many users need your attention.
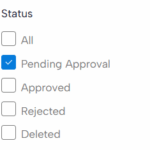
Another possibility to find all users that need to be approved is by using the Status filter on the left, so that only pending approval users are listed on the table.
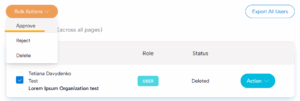
Once you have found the users that need approval, you can approve them in two ways.
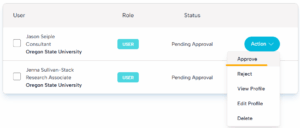
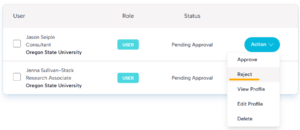
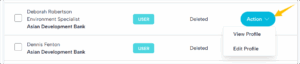
User by user
1. Click on the Action button on the row of the user
2. Click on the Approve button in the dropdown list
Multiple users
1. Select multiple users in the table
2. Click on the Bulk Actions button and select Approve
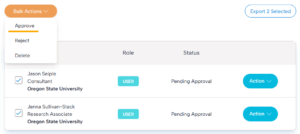
An email will be sent out to each and every user who was approved, informing them that they can now log in to the application.
How to reject a user?
A user can be rejected at any time. Rejecting a user will disable them from logging in to the application. Use the available filters to search for the users you want to reject. Once you have found them, you can reject them in two ways.
User by user
1. Click on the Action button on the row of the user
2. Click on the Reject button in the dropdown list
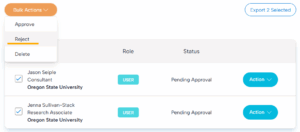
Multiple users
1. Select multiple users in the table
2. Click on the Bulk Actions button and select Reject
How to delete a user?
A user can be deleted at any time. Deleting a user will disable them from logging in to the application. A user should be deleted when, for example, they leave an organization and should no longer have access to the system. These users can be re-approved at any point in time. Use the available filters to search for the users you want to reject. Once you have found them, you can delete them in three ways.
User by user
1. Click on the Action button on the row of the user
2. Click on the Delete button in the dropdown list

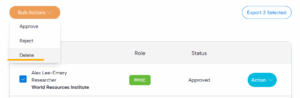
Multiple users
1. Select multiple users in the table
2. Click on the Bulk Actions button and select Delete
User by user at the organization level
1. In the dashboard, select the Organizations tab
2. Use the filters to find a specific organization. Click on the Action button on the row of the organization and select View
3. On the Organization profile page, you will be able to delete user by user through the Action button > Delete button in the dropdown list
Deleted users can be added again to the same organization at any time.
To do this, follow these steps:
The first way:
1. Filter users by Status Deleted
2. Select the desired users
3. Click Approve in the Bulk Actions drop-down list
The second way:
1. Filter users by Status Deleted
2. Select View/Edit Profile from the Action drop-down list
3. Click on the Approve button

4. Confirm action in pop-up
How can I edit the information of a user?
1. Use the filters to find the user you want to edit
2. Click on the Action button on the row of the user
3. Click on the Edit Profile button
4. Modify the information you wish to change
5. Click on the Save button
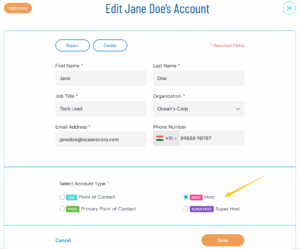
How to give Host privileges to a user?
A user can be granted Host privileges at any time. This means that the user will be able to log in to the application as a Host and, therefore, be able to manage commitments, users, and organizations. Use the available filters to search for the users you want to grant Host privileges to. Once you have found them, you can proceed in two ways.
User by user
1. Select Edit Profile from the Action drop-down list
2. Select Account type Host
3. Click the Save button
An email will be sent to each and every user who is granted Host privileges, informing them that they can now log in to the application as a host.
How to remove Host privileges from a user?
Host privileges can be removed from a user at any time. This means that the user will no longer be able to log in to the application as a Host and perform management operations. Use the available filters to search for the users you want to remove Host privileges from. Once you have found them, you can proceed in two ways.
User by user
1. Select Edit Profile from the Action drop-down list
2. Select Account type
3. Click the Save button
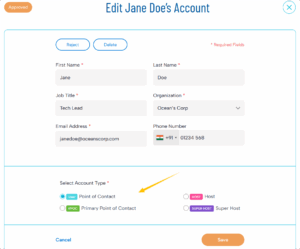
An email will be sent to every user who is removed from Hosts, informing them that they can no longer log in to the application as a host.
How to search for users?
You can search all users in the Users tab of the dashboard through the combined use of several filters:

- Text search field, that will search within the user’s first name, last name, and email.
- Organisation combobox, where you can select a specific organisation
- Status checkbox section, where you can select one or multiple statuses
- Role checkbox section, where you can select the user type role
Whenever you change one of these filters, a new search is performed, and only the users matching your search criteria will be displayed in the table.
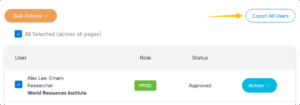
How to export a list of users?
You can export a list containing all users that match your search criteria. This list is a comma-separated value (CSV) file containing the user’s first name, last name, and emails. The separator used is a tab. This can be useful if you wish to, for example, send a general email (not supported by the application) to all users.
To export the list of users, simply go to the Users tab of the dashboard, check the Select All checkbox, and click on the Export button.
All tasks related to managing users are made available in the Organizations tab of the dashboard.
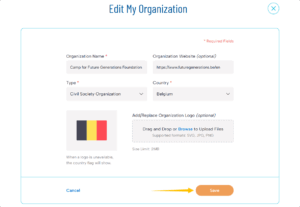
How to edit the information of the organization profile?
To edit an organization:
1. Select Edit from the Action drop-down list on the row of the desired organization
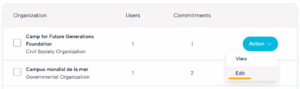
2. Edit organization details
*Organization name, entity type, and country are mandatory fields.
3. Click on the Save button
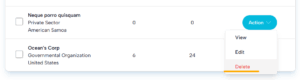
How to delete unused organizations?
An organization can only be permanently deleted if it has no users and no commitments. In these cases, there will be a Delete button available in the table row representing the organisation. To delete this organisation, simply press the Action button and select the Delete button.
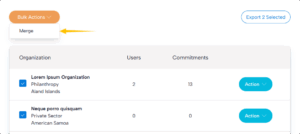
How to merge two organizations?
There might be cases where you want to merge two organizations into one. This means merging both users and commitments into one same organization. To merge two organizations:
1. Select two different organizations in the table
2. Click the Bulk Actions button and select the Merge button
3. Select the direction of the merging operation and click on the Continue button
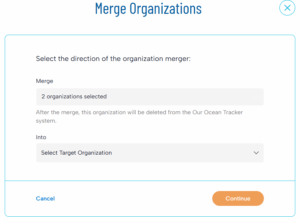
The arrow will display the direction of the merge, and a warning message will be displayed clarifying which organization will be deleted during the merging process.
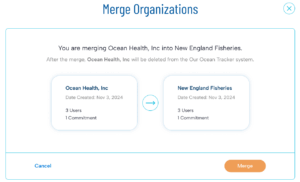
4. Click on the Merge button
How to search for organizations?
You can search organizations through the combined use of filters:
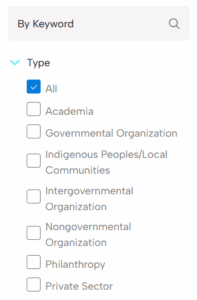
- Text search field, which will search within the organization’s legal name
- Type a checkbox section, where you can select one or multiple organization types
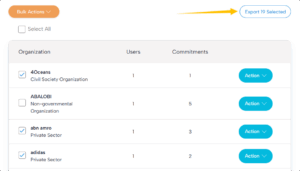
How to export a list of organizations?
You can export a list containing all organizations that match your search criteria. This list is a comma-separated value (CSV) file containing the organization’s legal name, type, country, and respective number of users and commitments. The separator used is a tab. To export the list of organizations, simply go to the Organizations tab of the dashboard, select the organizations, and click on the Export button.
All published commitments can be viewed in the Commitment Viewer, which includes two tabs: Visualizer and List.
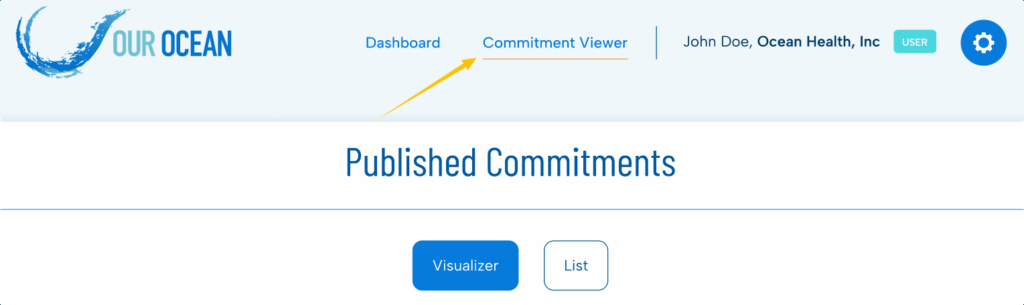
Both tabs offer the option to export data as a spreadsheet.
The Visualizer tab presents you with visual statistics on published commitments. You can quickly see the total number of commitments per conference, how commitments are distributed by status, action areas, and geographic areas of impact, as well as by types of organizations.
The List tab provides you with detailed information about each commitment, including its title, country, status, organization, start and end years, and more. You can filter commitments using the panel on the left side or search by keyword to quickly find specific commitments.
Introduction
This privacy statement explains the reason for the processing of your personal data, the way we collect, handle, and ensure the protection of all personal data provided, how that information is used, and what rights you have in relation to your personal data. It also specifies the contact details of the responsible Data Controller with whom you may exercise your rights.
Why and how do we process your personal data?
The Our Ocean Conference BackOffice website collects some minimal private data about users: name, email address, physical address and phone number. We use this information in order to remain in contact with you, to send you email confirmations or reminders. We may publish this personal data on the Our Ocean Conference BackOffice website, but only if you have given explicit authorization (checkbox of consent in the user profile screen).
How long do we keep your personal data?
Our Ocean Conference BackOffice website will keep this information in the database as long as you do not personally request to be removed. As a user, you can connect at any point of time to the BackOffice platform and ask to be removed as a user. In this situation, the user profile is marked as ‘deleted’ and we will only keep your name in the record (this is necessary because the system tracks changes to commitments, and remembers who made a modification.
How do we protect and safeguard your personal data?
All personal data is stored in a database hosted on Amazon AWS services. The servers are hosted in the United States. We take reasonable precautions to prevent hacking. For example, the usernames and password are encrypted, to prevent anyone from being able to steal the list of passwords.
Who has access to your personal data and to whom is it disclosed?
Access to your personal data is provided to the Our Ocean Conference Organizers staff responsible for preparing the next Our Ocean Conference and to authorized staff according to the “need to know” principle. Such staff abide by statutory, and when required, additional confidentiality agreements.
We will not share your personal data with any third-party, except for the very rare cases where the host country decides to commission a research study, in which case we may communicate your personal information the the selected research group so they can contact you on our behalf.
We will never sell your personal data to marketers or other commercial websites. The information we collect will not be given to any other third party, except to the extent and for the purpose we may be required to do so by law.
What are your rights and how can you exercise them?
You may have heard about the General Data Protection Regulation (“GDPR”) in Europe. GDPR gives people under its protection certain rights with respect to their personal information collected by us on the Site. Accordingly, we recognize and will comply with GDPR and those rights, except as limited by applicable law. The rights under GDPR include:
- Right of Access. This includes your right to access the personal information we gather about you, and your right to obtain information about the sharing, storage, security and processing of that information.
- Right to Correction. This is your right to request correction of your personal information.
- Right to Erasure. This is your right to request, subject to certain limitations under applicable law, that your personal information be erased from our possession (also known as the “Right to be forgotten”). However, if applicable law requires us to comply with your request to delete your information, fulfillment of your request may prevent you from using Basecamp services and may result in closing your account.
- Right to Complain. You have the right to make a complaint regarding our handling of your personal information with the appropriate supervisory authority.
- Right to Restrict Processing. This is your right to request restriction of how and why your personal information is used or processed.
- Right to Object. This is your right, in certain situations, to object to how or why your personal information is processed.
- Right to Portability. This is your right to receive the personal information we have about you and the right to transmit it to another party.
- Right to not be subject to Automated Decision-Making. This is your right to object and prevent any decision that could have a legal, or similarly significant, effect on you from being made solely based on automated processes. This right is limited, however, if the decision is necessary for performance of any contract between you and us, is allowed by applicable European law, or is based on your explicit consent.
Contact information
If you would like to exercise your rights under GDPR, or if you have comments, questions or concerns, or if you would like to submit a complaint regarding the collection and use of your personal data, please feel free to contact the Organizing team at OurOceanConference@gmail.com.
Flow Chart: How It Works
![]()
